Thursday, November 10, 2016
Excel 2003 Setting for ORACLE WEB ADI
setup IE
Tool > Internet option > tab Security
internet > customer level > Under ActiveX Control and plug-ins
Initialize and script ActiveX control set to PROMPT
Excel 2003
Tool > Option >tab Security
buttom Macro Security > tab Trusted Publicsher > Checked Trust access to Visual Basic Project
Tool > Internet option > tab Security
internet > customer level > Under ActiveX Control and plug-ins
Initialize and script ActiveX control set to PROMPT
Excel 2003
Tool > Option >tab Security
buttom Macro Security > tab Trusted Publicsher > Checked Trust access to Visual Basic Project
Pc Setting for ORACLE WEB ADI
SETUP IE
tool > internet option
tab security
trusted site ( uncheck requeire https) add site
http://xxxxxxx.co.th
EXCEL 2010
File > option > trust center > click trust center setting
activex settings : Enable all controll ....
Macro Settings : Enable all macro ....
checked trust access to the VBA ....
Protected View : uncheck all Enable protected ..... (3 uncheck)
: checked Enable data execution pro .....
Thursday, October 22, 2015
name:ACC Second BUY
{name:ACC Second BUY}
uptrend:=barssince(cross(macd(),mov(macd(),9,e)))>0;
lastprice:=ref(c,-1)>mov(ref(c,-1),26,e) and ref(c,-1)todayprice:=c>ref(c,-1);
uptrend and lastprice and todayprice;
{The Explorer in MetaStock}
uptrend:=barssince(cross(macd(),mov(macd(),9,e)))>0;
lastprice:=ref(c,-1)>mov(ref(c,-1),26,e) and ref(c,-1)
uptrend and lastprice and todayprice;
{The Explorer in MetaStock}
name:ACC First BUY
{name:ACC First BUY}
mac:=cross(macd() , mov(macd(),9,e));
emv6:=cross(mov(c,6,e),mov(c,13,e));
emv9:=cross(mov(c,9,e),mov(c,20,e));
emv12:=cross(mov(c,12,e),mov(c,26,e));
barssince(mac)>0 and barssince(emv6)>0 and barssince(emv9)>0;
{The Explorer in MetaStock}
mac:=cross(macd() , mov(macd(),9,e));
emv6:=cross(mov(c,6,e),mov(c,13,e));
emv9:=cross(mov(c,9,e),mov(c,20,e));
emv12:=cross(mov(c,12,e),mov(c,26,e));
barssince(mac)>0 and barssince(emv6)>0 and barssince(emv9)>0;
{The Explorer in MetaStock}
Monday, January 13, 2014
Sunday, January 05, 2014
Oracle FIN cannot export TSV file
*******************************
-
Try the following as part of quick check:
In the Tools -> Internet options, set the following:-
Open Internet Explorer and choose Tools-->Internet Options
-
Click on the Security Tab
-
Click the Custom Level button
-
Scroll down to the "Downloads" options
-
Enable the option "Automatic prompting for file downloads"
-
Enable the option "File Download"
-
-
*******************************
If still getting an error , you need to verify these details too.
-
In Internet Explorer select the Tools menu - Internet Options - Security - Custom Level
- Adjust all the settings for ActiveX Controls and Downloads to be either 'enable' for the following zones :
- - Internet
- - Local Intranet
- - Trusted Zones
- Try to add the site of instance to Trusted Zone and adjusted Security level to Low protection.
- Restart the browser and now test.
*******************************
>>Simple, press the ctrl button in the keyboard and then click the File->Export.
>>It will work for sure! ENJOY…
*******************************
Ref: http://www.oracleappshub.com/aol/user-unable-to-export-data-to-tsv-file/
********************************
tag : Export data from oracle application , unable to export from oracle application , TSV file , Exporting .tsv file , User Unable to Export Data to TSV File , Internet Explorer , IE
Friday, October 25, 2013
ขั้นตอนการทำ Direct Deposit ของ Amazon
สิ่งที่ต้องมีสำหรับการรับเงินแบบ Direct Deposit ของ Amazon
-บัญชีเงินฝากออมทรัยพ์ธนาคารแบงค์กรุงเทพในไทย สาขาใดก็ได้
ขั้นตอนการทำ Direct Deposit ของ Amazon
1. Login Amazon Associate (affiliate-program.amazon.com)
2. คลิก Account Settings เมนูมุมขวาบน
3. คลิก Change Payment Method
4. เลือก Direct Deposit แล้วใส่ค่าตามนี้
- Bank Name: BANGKOK BANK
- Bank Account Holder Name: ชื่อบัญชีเรา ภาษาอังกฤษ
- Bank Account Type: เลือก Savings
- Bank Account Number: ใส่หมายเลขบัญชีธนาคาร 10 ตัวของเราลงไป
- Routing Number / ABA Number: 026008691
(http://www.tkung.org/wp-content/uploads/2010/12/direct-posit-amazon.png)
5. กด Submit เพื่อยืนยันการเปลี่ยนแปลง
Friday, October 18, 2013
How to install java in Ubuntu
Hello Linux Geeksters.
In this article I will show you how to install the Oracle Java (JDK) 8, Oracle Java (JDK + JRE) 7 or Oracle Java (JDK) 6 on Ubuntu 13.04, Ubuntu 12.10 and Ubuntu 12.04.
The Oracla Java has been removed from the official Ubuntu repositories due to some Java licence issues.
Before you install it, remove OpenJDK, if you have it installed:
$ sudo apt-get purge openjdk*
To install Java 8/7/6, do this:
In order not to get issues with the add-apt-repository command, install the following package:
$ sudo apt-get install software-properties-common
Add the PPA:
$ sudo add-apt-repository ppa:webupd8team/java
Update the repo index:
$ sudo apt-get update
Install Java 8:
$ sudo apt-get install oracle-java8-installer
Or, install Java 7:
$ sudo apt-get install oracle-java7-installer
Or, install Java 6:
$ sudo apt-get install oracle-java6-installer
ref:
http://linuxg.net/how-to-install-oracle-java-jdk-678-on-ubuntu-13-04-12-10-12-04/
Saturday, July 13, 2013
Share Printer Win7 on Home Network
เครื่องที่ติดตั้ง printer ให้ทำการ share printer
ไปที่ control panetl
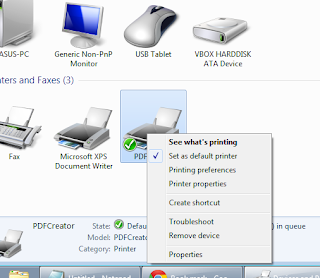
ตรง Hardware and Sounde เลือก view device and printer

ไปที่ control panetl
ตรง Hardware and Sounde เลือก view device and printer

เลือก printer ที่ต้องการ share แล้ว click ขวา
เลือก tab Sharing
click Sharing Printer ดังรูป
ดูวิดีโอเพิ่มเติมได้ที่ youtube
hxxp://www.youtube.com/watch?v=skbLwddFShg
Subscribe to:
Comments (Atom)


